Intro
In this series of Best Practice articles I talk about migrating websites and emails from a Plesk 11 run server to a Virtualmin run server. It describes in details the steps involved, including the eventual pitfalls and other thing I came across whilst doing it. Note that this documentation is addressed to people with medium expertise in linux/system administration.
Useful customisation
Most of VM defaul settings are fine, however in order to make it a little easier to migrate websites, the following mods are useful.
Server Template – Apache directives
As Plesk websites are hosted under $Documentroot/httpdocs this can be set by default before creating website by editing the Apache website default config:
VM Menu > Server Templates > Default Settings > Edit template section: apache website
Change: DocumentRoot ${HOME}/public_html
To: DocumentRoot ${HOME}/httpdocs
Change: <Directory ${HOME}/public_html>
To: <Directory ${HOME}/httpdocs>
Under “Users’ website subdirectory to create“.
Change: Default (public_html)
To: [httpdocs]
Account Plans
One may customise them to match previous Plesk hosting “plans”, however this is not mandatory.
Virtual website creation – Admin username
The only requirement in this process is to create the Administration username as a “Custom username” giving it the domain.tld name (i.e. mydomain.com). This way the websites paths will end up being: /home/domain.tld, which makes it easier to do a path change from /var/www/vhosts to /home wherever there are scripts configurations containing full paths.
Perl
I am a perl script writer thus I use perl extensively, over the years I have created scripts that require a few additional modules. I shall not go into details with them (yet), however there’s an important bit I must mention, some perl scripts I use have a different #!. Some point to the sometimes non-existent /usr/local/bin/perl, so in order to avoid these script throwing an error I simply link it to the whereis perl (usally /usr/bin/perl or /bin/perl):
ln -s /usr/bin/perl /usr/local/bin/perl
Website content transfer
To transfer website content from Plesk to VM it is a matter of rsyncing each website with the rsync command, to minimise the load, the following commands are run at nice 20 from the source server, note that the target server must have the virtual server already configured prior to doing this, otherwise an error will be thrown:
rsync -avz --rsh='ssh -p{port}' /var/qmail/mailnames/{domain}/{user}/ root@{server}:/home/{domain}/homes/{user}/
Where:
- port is the ssh port (if different than 22, which is recommended for security)
- domain is the domain to be transferred
- target is is the target server IP or domain
Depending on the size of the website this might take some time. Note that I am not really needing to transfer statistical information over. most if not all the required files are under httpdocs and cgi-bin in my case.
After the transfer, on the target server, ownership of the directories must be set:
chown -R {username}:{username} /home/{domain}/httpdocs /home/{domain}/cgi-bin
Where:
- username is the owner of the httpd and cgi-bin content (in my case I created a username matching the domain, making it easier to find the correct directory under /home when working over the CLI.
- domain is the domain
Email content transfer
The operation of transferring emails to the target server are pretty much the same as website transfer, with a couple of exceptions.
nice -20 rsync -avz --rsh='ssh -p{port}' /var/qmail/mailnames/{domain} root@{target}:/home/{domain}/home/
Where:
- port is the ssh port (if different than 22, which is recommended for security)
- domain is the domain to be transferred
- target is is the target server IP or domain
After the transfer, on the target server, ownership of the directories must be set:
IMPORTANT: note user is user.domain (not just domain)
chown -R {user}.{domain}:{domain} /home/{domain}/homes/{user}/
Where:
- user is the name of the user
- domain is the name of the domain
IMAP changes (At client level, here using Thunderbird)
Server name: no change
Username: replace @ with .
Connection security: from SSL/TLS to STARTTLS
Authentication method: from encrypted password to normal password
SMTP changes (At client level, here using Thunderbird)
Server name: no change
Port from 25 to 587
Connection security: from SSL/TLS to STARTTLS
Authentication method: from encrypted password to normal password
Username: replace @ with .
Database content transfer
Source server
mysqlcheck --optimize {database} --auto-repair  -uadmin -p`cat /etc/psa/.psa.shadow`
mysqldump -uadmin -p`cat /etc/psa/.psa.shadow` --flush-logs --opt {database} > {database}.sql
Where:
- database is the database name
Target server (after rsyncing all the dbs dumps on it)
VM Menu > Edit Databases > (manage current database usually called {domain}_{tld}) or create a new one if required.
click Manage …
Click Execute SQL
Run SQL from file Tab
From local file (browse to file)
Click Execute
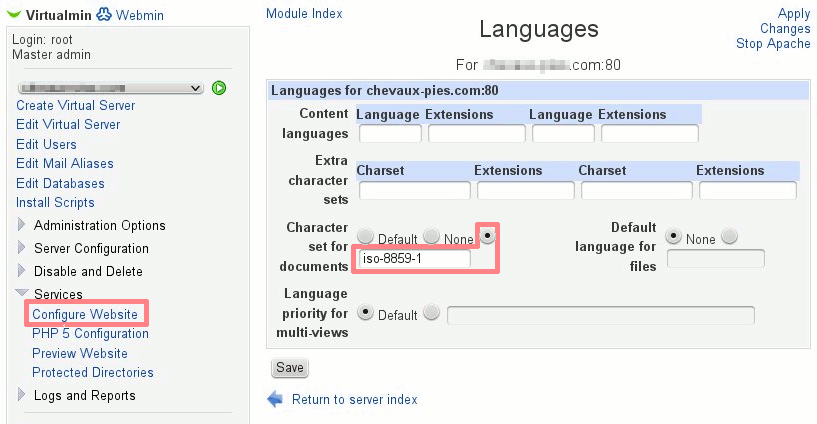
Special characters
Sites with accents (like French’s)
The charset must be edited in the following Module:
Select Domain > Menu > Services > Configure Website > Languages > Character set for documents (x) iso-8859-1
Save, apply changes.
