Intro
In this series of best practice articles I talk about migrating websites and emails from a Plesk 11 managed server to a Virtualmin managed server. It describes in some details the steps involved in doing it remedy the pitfalls and other things I came across whilst doing it. Note that this documentation is address to people with medium expertise in linux/system administration.
Hardware
A fresh install of a super fast multi-core web server with sufficient RAM and [Hardware] RAID 1 partitioned as follow:
- / = 12GB
- /swap => RAMx2 (recommended) however I set it to RAMx1 as the RAM rarely “swaps”.
- /var = 1/2 of the rest of the space
- /home = 1/2 of the rest of the space.
As I have a few websites to run, a 250GB HDD was my choice, so /var and /home are about 100GB each which gives me more than enough space for the moment, bearing in mind that one can always increase this easily by swapping bigger RAID mirrors one after the other followed by a quick partition resize.
Partitions allocation
I chose to split /var and /home from / because:
- /home will contain all the websites and emails
- /var usually contains log files, firewall, partition, users information etc.
- /var will contain an image backup of /home and /
Backup
The RAID 1 disk setup pretty much solves the “disk failure” challenge, but not data loss due to human error (or otherwise). So a solid backup strategy is essential. My plans are currently to have an image snapshot made of the bare server before adding websites, to do this I have been quite impressed by the backup products from Idera, more particularly “Server Backup” which is free with some disabled features (like remote backups management), however I feel it might be a little too much for me, I really need a simpler interface to use, that is why I was initially interested in their “Hot Copy” product, which I haven’t tested yet. With Hot copy, I would take a snap shot of /home on /var and vice versa which I would then upload to a backup server. Simple and neat. Please note that Idera (now R1soft) does not distribute hot copy any more.
Providing that Hot Copy does not interfere with the OS too much (I like the OS to remain “as is” to avoid conflicts (like Plesk has recently given me with Emails refusing to be send using Qmail, only Postfix worked, one of the reason I give up on Plesk. Too much interfering).
Initial Steps
The very first thing to do on a brand new server is:
-
-
- Check that the IP address [range] is not Blacklisted for sending spam
- Set the hostname (/etc/hosts and /etc/sysconfig/network) and Reverse (PTR) pointer accordingly (the PTR must be set by your provider on their DNS servers)
- Install rkhunter and run it with
rkhunter -c --update --propupd
- Change SSH port and activate passwordless authentication
- Install Virtualmin (best way is to download the install.sh with wget, make it executable
chmod +x install.shand run it./install.sh) and customise the Directoryindex directive and the Primary Default Websiteyou may also do additional customisation outlined here(page to be created)
-
Non essential installs (but recommended)
In addition to the above minimum installs. Here are a few more things that, I reckon is a good idea to have:
screen
Screen is a great app when working with ssh, it allows you to close your terminal window without losing your remote session, screen “attaches” terminal window to your terminal and “detaches” itself when you close your window (or your office internet connection drops for whatever reason), this is particularly useful when you don’t want to leave your terminal opened when a long process is being run (like a backup etc.).
tree
tree is used by one of my perl scripts to do fast, recursive line replacements in files within a directory.
Use yum to install any additional applications, like:
yum install screen tree
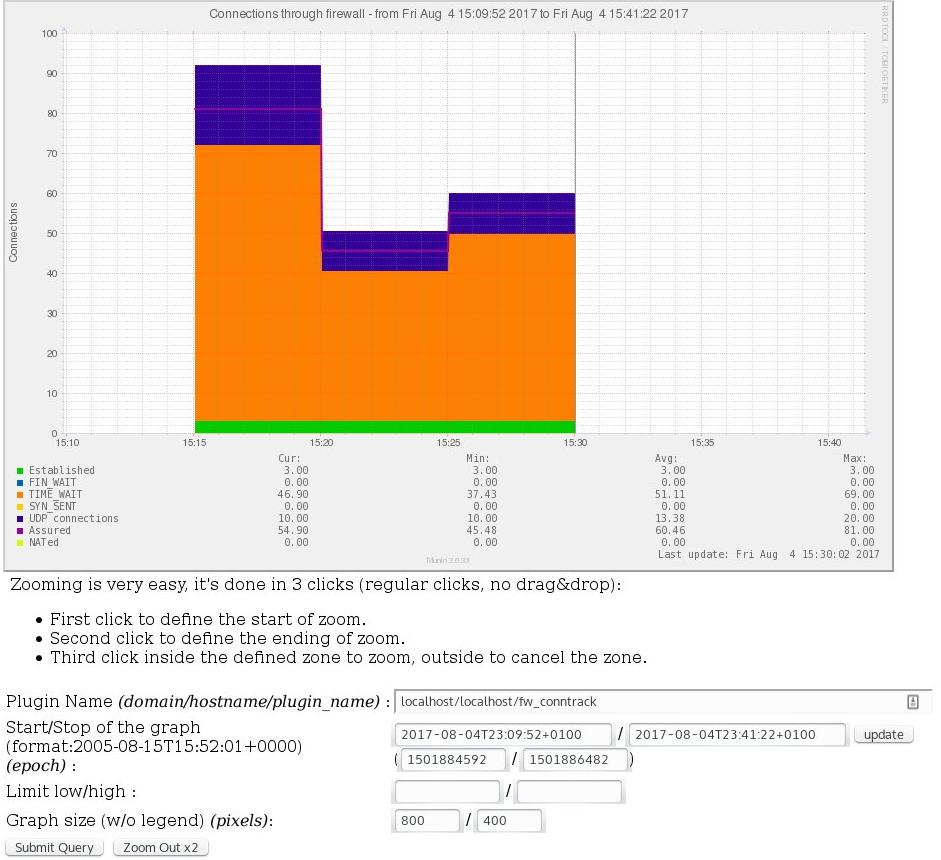
Server stats – Munin
I used to have HotSaNIC on my previous dedicated, however since this application is over 10 years old now, it’s a little arduous to install. After having tested two alternatives, namely Nagios and Munin, I went for Munin.
Munin is exactly like Hot Sanic but with more graphs than you can shake a stick at. However installing Munin on Centos 6 is not a straight forward thing, an additional (epel) repository the must be added.
cd ~
wget http://dl.fedoraproject.org/pub/epel/6/x86_64/epel-release-6-8.noarch.rpm
rpm -Uvh ~/epel-release-6-8.noarch.rpm
yum install munin munin-node
Important!: The Epel repository must be disabled after the install otherwise Virtualmin updates incompatible packages resulting in some application no longer working
To disable the epel repository, edit /etc/yum.repos.d/epel.repo and change enabled=0 to 1 under the [epel] section:
[epel]
....
enabled=0 #(was 1)
...
Normally Munin installs everything pretty much as it should, all I had to do is create a username login and password (below the username is Munin, but it could be anything, like admin, joe etc.):
htpasswd -c /etc/munin/munin-htpasswd Munin
The default location for the Munin graphs are under /var/www/html/ (VM default), to enable access to this folder, this httpd.conf hack must be done. Otherwise the munin.conf must be changed accordingly.
Start Munin and at boot
Start munin manually:
service munin-node start
Munin does not start at boot by default, this is why it must be enabled with:
chkconfig munin-node on
After 5 minutes, pages will populate the /var/www/html/munin directory, that is 5 minutes by 5 minutes information about the server from the moment you start it. Forever.
Post install snags
Once all the above is installed it’s time to run some tests. To this end it is best to create a virtual server to check all is working as it should, in my case, it almost always involves the hostname and email (Postfix) service.
Issue 1: Setting a hostname up
The most important aspect of a web server, yet the bit that always catches everyone with little experience in the field. In a brand new server, the hostname can be anything the Sysadmin has decided to use by default for its server pool install. So it must be changed.
The command to check the current hostname is:
# hostname
somename
Where “somename” is the current name of the host that needs changing
To set a new hostname and make it coherent for the appliance, two files must be edited:
-
-
- /etc/hosts
- /etc/sysconfig/network
-
/etc/hosts
The default entries in /etc/hosts are usually:
127.0.0.1   localhost.localdomain localhost4 localhost4.localdomain4
::1         localhost.localdomain localhost6 localhost6.localdomain6
A third line must be added with the hostname and IP address (i.e. hostname = some.domain.net & IP = 111.222.001.111):
127.0.0.1   localhost.localdomain localhost4 localhost4.localdomain4
::1         localhost.localdomain localhost6 localhost6.localdomain6
111.222.001.111 some.domain.net
/etc/sysconfig/network
The other file is /etc/sysconfig/network which should look like:
NETWORKING=yes
HOSTNAME="some.domain.net"
Where “some.domain.net” is your Fully Qualified Domain Name (FQDN)
Addendum: The above is not required for Ubuntu distros.
Ubuntu and SMTP/Postfix
For this type of distro. edit /etc/postfix/main.cf and change the myhostname to the correct FQDN as above.
The above will not be taken in consideration immediately but after a reboot (and also restart/reload Postfix configuration, for Ubuntu), to avoid rebooting and set the hostname immediately simply type:
hostname some.domain.net
Issue 2: Postfix and SMTP
I always have trouble with emails, it’s a total mystery to me as to why it should be so much of a pain in the backside to get working. There’re almost always problems with email service! (at least for me).
Summary of possible problems
In my latest install here are the errors reported by Virtualmin I encountered:
-
-
- postfix: fatal: parameter inet_interfaces: no local interface found for {IP address here}
- The procmail command /usr/bin/procmail is owned by group mail, when it should be owned by root. Email may not be properly delivered or checked (….)
- The sending of emails via SMTP (SSLTLS/plain password on port 587) was timing out.
- Automatic BCCing of outgoing email cannot be enabled unless a BCC map is defined in the Postfix Mailserver module, or manually in the Postfix configuration file. Otherwise it must be turned off on the module configuration page.
-
Below are the lines that needed replaced (or added) to sort issue 1 to 3 – stop postfix first!:
Note that a backup of any files before editing is RECOMMENDED. In my case I did a hotcopy first :-).
For /etc/postfix/main.cf:
inet_interfaces = localhost
changed to >>
inet_interfaces = all
---
mailbox_command = /some/where/procmail
changed to >>
mailbox_command = /usr/bin/procmail-wrapper -o -a $DOMAIN -d $LOGNAME

Added:
======
smtpd_sasl_auth_enable = yes
broken_sasl_auth_clients = yes
smtpd_recipient_restrictions = permit_mynetworks permit_sasl_authenticated reject_unauth_destination
mailbox_size_limit = 0
allow_percent_hack = no
For /etc/postfix/master.cf:
smtp      inet  n       -       n       -       -       smtpd
changed to >>
smtp  inet    n       -       n       -       -       smtpd -o smtpd_sasl_auth_enable=yes
---
Added :
=======
submission    inet    n       -       n       -       -       smtpd -o smtpd_sasl_auth_enable=yes
Note: the above provided for info only, no responsibility held in any events, I had tried just about everything when I recalled that I luckily had a fully operational VPS from which I simply copied the master.cf and main.cf without forgetting to change the “mydestination” option to the correct hostname, it did the trick.
Below is the changes made to fix issue 4:
Automatic BCCing of outgoing email cannot be enabled unless a BCC map is defined in the Postfix Mailserver module, or manually in the Postfix configuration file. Otherwise it must be turned off on the module configuration page.
In VM Go to Webmin > Servers > Postfix Mail Server > BCC Mapping and set the Sender BCC as follow (mine was “No Map Set”):
Once all is set as it should a nice message from VM:
.. your system is now ready for use by Virtualmin.
Optional security and administration steps to harden server
-
-
- Enable passwordless SSH
- Change Webmin default port (10000) to a different one (here is set to 5555) make sure it does not clash with a port already in use!
-
-
-
- Set root email alias to forward system emails to your admin email of sort, when set, all root emails, firewall , schedules etc.. will sent to the email provided, quite handy to keep tab on the server activity.
-
-
-
- Restrict Webmin access to specific IP addresses
-
One thought on “Plesk 11 to VM – Part 2: Bare server set up”
Comments are closed.