MOS Fet Hi-Fi Power Amplifier

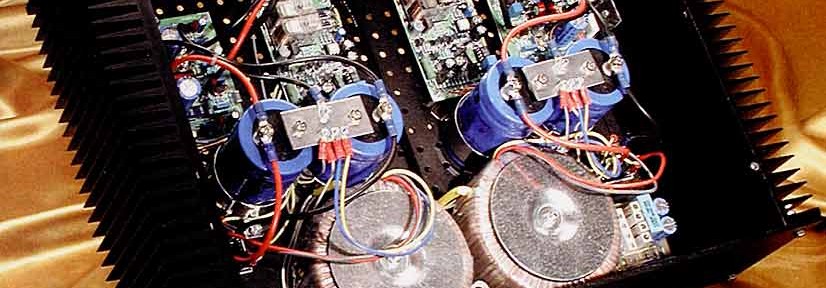
Now that my DIY webcam project is nearing to completion, I am planning to work on some (old) new one. Crescendo MEBack in 1985 I build a Hi-Fi Power amplifier, I still have the blue prints and I am keen to rebuild it. These days, with MP3 gizmos, music kind of lost it’s spark, It’s amazing how much presence is felt when you play a good old Vinyl, no wonder it’s coming back into fashion!

Long live Analog!

Webcam System Gallery etc…

Latest Webcam snap

My Webcam system is finally finished, I have  waterproofed the system and it is now located outside above the stable building, allowing a full 370o Pan and 190o Tilt!

Here is the Gallery pages showing snaps with 5 minutes intervals. This setup has been sourced from Mitch Fournier’s Blog and rewritten in Perl executed by a 5 minutes Cron.

The rig is entirely DIY made with wood, screws,13 switches, cables, 2 electric motors, 4 servos, an Arduino Uno connected to a PC via USB loaded with a Python script from principialabs.com, The camera controls can be manually overridden. The camera itself was bought on Ebay as “spare repair (the tape does not load)” connected to an Analog TV card, finally, the web streaming is handled by a piece of Software called Palantir. The whole hardware/software is Open Source. Any Camcorder can be used as the bracket is able to hold any moderately light camera hardware.

The Pan Tilt Kit is controllable via a web page via buttons (see flash animation above) and Ajax Dynamic Content. The web cam has two Zoom speeds and currently one speed Pan and Tilt, however it is capable of two speeds, still to write code to enable that.

The Kit

Here are a few shots of the kit. Bear in mind this is a DIY job with cheap hardware!

The Switching Unit, Servos and all
Camera and Bracket
Details of the Servo managing the Zoom.
Wires!
Wires!
View from behind the rig
The camera: Samsung, but any will do!

Here are two short Videos showing the rig in action:

Webcam

I am please to announce that the “custom” made webcam is functional! Took me a while but I now have a fully operational pan/tilt/zoom home made rig. For security reasons, the access to the cam is restricted. I am re-enforcing the wiring and changing the configuration to a more compact setup.

As promised. Once I have it all ready I’ll show it in action and how I did it.

I am sure that most people will say there are easier ways to do it but my main aim was to experiment and it turned out to be very easily customisable.

Piloting servo motors using Arduino. Update

Hi there, sorry long time not spoken about this.

I am about to be finished with this project. I am awaiting a motor for the camera rotation as my first one’s was alittle flimsy (a rotisserie motor bah). The kit’s all fitted and test runs worked well.

I still need to enable a web interface to pilot the servos and we should be all good to go.

Thanks for reading…

Piloting servo motors using Arduino.

New project on the rails, a system to control a webcam movement using motors and servos to switch them on and off…

As a reference I have found  here.

Here are the step used to make the servo work, on an (K)ubuntu machine:

  1. Install arduino repository:
    sudo add-apt-repository ppa:arduino-ubuntu-team
  2. Install arduino:
    sudo apt-get install arduino
  3. Start arduino in the command line:
    > arduino
  4. Select the correct port in Tools> Serial Port (tick the box)
  5. Copy/paste the code, compile and upload it
  6. Install pyserial (you may need to install easy_install with sudo apt-get install easy_install* python-setuptools:
    easy_install -U pyserial
  7. cwd to the servo.py path and call python:
    python
    >>>import servo
    >>>servo.move(1,0)
  8. Your servo should move

I will update when I have done more work

* apparently apt-get install python-setuptools is enough, don’t insert “easy install” in the cmdline