When, like me, you get paranoid to losing your data or web server functionality…
I have created a little perl script to allow the synchronization of MySQL databases and /home between my Webservers.
The master server (where the script runs from) is the main production server, the salve server is on standby just in case.
I can appreciate that the passwords are clearly inserted in the script and it is a security issue. Nonetheless, I am the only admin and no other users have ftp or other privileges on both servers. I am sure that there is a way to prevent this but I am happy with the current situation and, obviously I am also making a regular backup of the master server on an external backup provider (I use rsync.net).
#!/usr/bin/perl
# Performs a synchronisation of home folder and dumps sql databases
# from one Virtual server to another using rsync and secure shell
#
# Written by G.Serex Sharpnet UK (c) 03.12.2020

# Var definitions

############### SQL Config #############
# SQL root username
$username = "root";
# Local SQL root password
$password = "localmysqlpassword";
# Remote SQL root password
$rpassword = "remotemysqlpassword";
# The dumped files path . (absolute path + trailing / please)
$dumped_dbs_path = "/root/mysql/";
# The dumped file name
$dumped_db = "dump.sql";
# Name of the database to exclude from the dump (here the mysql and sys are obviously dedicated to each server, so don't dump them!)
$exclude_database = "mysql,sys,information_schema,performance_schema";

################ SSH Config #################

# The remote host name
$remotehost = "ipaddress";

#The ssh username
$sshusername = "root";

#The ssh port
$sshport = "xx";

#____ E N D _ V A R _ D E F S. ________________

# First check and optimise the lot.

# A little house keeping
system("/usr/bin/mysqlcheck --optimize --all-databases --auto-repair -u $username -p$password");

# Dump the dbs
system("/usr/bin/mysqlpump -u $username -p$password --exclude-databases=$exclude_database --add-drop-table --result-file=$dumped_dbs_path$dumped_db");

# Transfer them abroad
system("/usr/bin/rsync -avz -e 'ssh -p $sshport' $dumped_dbs_path $sshusername\@$remotehost:$dumped_dbs_path");

# Restore the dump abroad

system("/usr/bin/ssh -p $sshport $sshusername\@$remotehost 'mysql -u root -p$rpassword < $dumped_dbs_path$dumped_db'");

# rsync the home directory

system("/usr/bin/rsync -avz --delete -e 'ssh -p $sshport' /home/ $sshusername\@$remotehost:/home");
exit;
In this series of Best Practice articles I talk about migrating websites and emails from a Plesk 11 run server to a Virtualmin run server. It describes in details the steps involved, including the eventual pitfalls and other thing I came across whilst doing it. Note that this documentation is addressed to people with medium expertise in linux/system administration.
Useful customisation
Most of VM defaul settings are fine, however in order to make it a little easier to migrate websites, the following mods are useful.
Server Template – Apache directives
As Plesk websites are hosted under $Documentroot/httpdocs this can be set by default before creating website by editing the Apache website default config:
VM Menu > Server Templates > Default Settings > Edit template section: apache website
Change: DocumentRoot ${HOME}/public_html
To: DocumentRoot ${HOME}/httpdocs
Change: <Directory ${HOME}/public_html>
To: <Directory ${HOME}/httpdocs>
Under “Users’ website subdirectory to create“.
Change: Default (public_html)
To: [httpdocs]
Account Plans
One may customise them to match previous Plesk hosting “plans”, however this is not mandatory.
Virtual website creation – Admin username
The only requirement in this process is to create the Administration username as a “Custom username” giving it the domain.tld name (i.e. mydomain.com). This way the websites paths will end up being: /home/domain.tld, which makes it easier to do a path change from /var/www/vhosts to /home wherever there are scripts configurations containing full paths.
Perl
I am a perl script writer thus I use perl extensively, over the years I have created scripts that require a few additional modules. I shall not go into details with them (yet), however there’s an important bit I must mention, some perl scripts I use have a different #!. Some point to the sometimes non-existent /usr/local/bin/perl, so in order to avoid these script throwing an error I simply link it to the whereis perl (usally /usr/bin/perl or /bin/perl):
ln -s /usr/bin/perl /usr/local/bin/perl
Website content transfer
To transfer website content from Plesk to VM it is a matter of rsyncing each website with the rsync command, to minimise the load, the following commands are run at nice 20 from the source server, note that the target server must have the virtual server already configured prior to doing this, otherwise an error will be thrown:
port is the ssh port (if different than 22, which is recommended for security)
domain is the domain to be transferred
target is is the target server IP or domain
Depending on the size of the website this might take some time. Note that I am not really needing to transfer statistical information over. most if not all the required files are under httpdocs and cgi-bin in my case.
After the transfer, on the target server, ownership of the directories must be set:
username is the owner of the httpd and cgi-bin content (in my case I created a username matching the domain, making it easier to find the correct directory under /home when working over the CLI.
domain is the domain
Email content transfer
The operation of transferring emails to the target server are pretty much the same as website transfer, with a couple of exceptions.
IMAP changes (At client level, here using Thunderbird)
Server name: no change
Username: replace @ with .
Connection security: from SSL/TLS to STARTTLS
Authentication method: from encrypted password to normal password
SMTP changes (At client level, here using Thunderbird)
Server name: no change
Port from 25 to 587
Connection security: from SSL/TLS to STARTTLS
Authentication method: from encrypted password to normal password
Username: replace @ with .
Target server (after rsyncing all the dbs dumps on it)
VM Menu > Edit Databases > (manage current database usually called {domain}_{tld}) or create a new one if required.
click Manage …
Click Execute SQL
Run SQL from file Tab
From local file (browse to file)
Click Execute
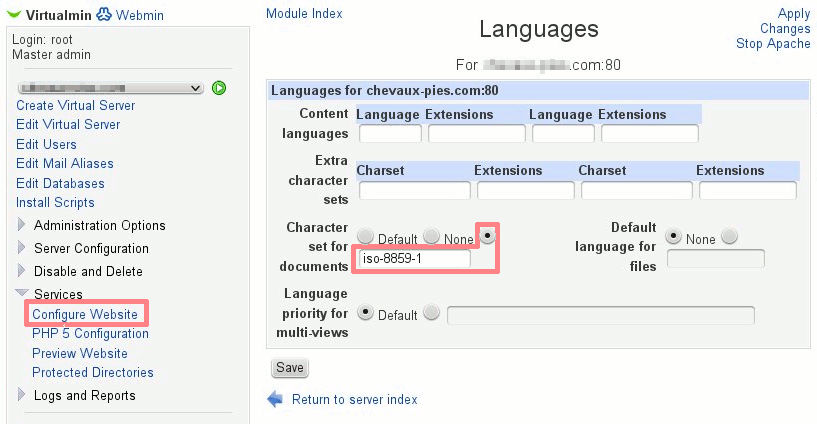
Special characters
Sites with accents (like French’s)
The charset must be edited in the following Module:
Select Domain > Menu > Services > Configure Website > Languages > Character set for documents (x) iso-8859-1
This command will write the result on a new line in the file called pingtest.txt every 5 minutes. Which will look like that:
You have 192.168.1.1 192.168.1.19 on 06 01 13 @ 20:05:01
You have 192.168.1.1 192.168.1.19 on 06 01 13 @ 20:10:01
You have 192.168.1.1 192.168.1.19 on 06 01 13 @ 20:15:01
Plesk backup is a real pain in the backside, if your server disk space is limited, even when choosing to backup in a ftp repository. All the files are created locally and then send over via ftp.
Prerequisites
Note that in order to implement this backup strategy, one must have an external backup space available like rsync.net (which I use) so that you can use the “rsync” command to transfer your files.
Minimising disk usage
In order to exclude any gigantic compressed (or not) archives being stored in your local hard drive, here is a little guide to help you avoid filling your server disk.
The first thing to backup regularly is the Plesk server configuration, this backup will not save the websites/email/database data but the content/configuration of your Panel, which is the first thing to restore if your server packs up.
Backing up Plesk (11) configuration
Open your Plesk Panel as Admin
Choose Tools & Settings from the Server Management sub-menu
Click on Backup Manager
Select Scheduled Backup Settings
Activate the scheduled backup
Select Store backup in: Server repository (or you can chose ftp there also as the files aren’t big, a couple of MB’s)
I have set the Maximum number of backups in repository to “3”, but you can choose another value here
Under the Backup content section, select ““
Press OK
Obviously the choice of Schedule and prefix is at your convenience, I personally back up every day at 00:10 and the prefix is set to “configuration”.
If you aren’t using ftp, the content of this backup is stored in the /var/lib/psa/dumps/ directory. So in order to backup this on another server, simple rsync this location with a command that could be:
To automate all this simply stick it in a cron (one can use the “Scheduled Tasks” under “Tools & Settings” (select root user) with a command that could look like this:
nice -20 rsync -avz --stats --delete /var/lib/psa/dumps/ user@domain.rsync.net:var/lib/psa/dumps 2>&1 | mail -s "backups dir rsync report" you@youremail
Databases
I will refer to MySQL databases in this section.
Database content is important, and you must back them up regularly, be it incrementally or not. I have Perl scripts that are in charge of dumping the content of the entire dataset and compress it. The file for my setup ends up being about 300MB, which is acceptable. I proceed to dump the content of the dataset via a “schedule” (root cron) and another cron simply “rsync’s” this file over to the backup server.
Email
All the email accounts are in /var/qmail/mailnames, the process is the same as above, use a rsync via a cron:
There you have it, obviously I am providing this entirely as guidance and will in no way be liable for any loss you may get using these instructions. Even if you are on a cloud server (like me) it is a good idea to be able to extract files, especially databases or web content should a mistake be made that a cloud server cannot prevent like deleting a site by mistake etc…
Feel free to comment if you have any questions or if I have missed some important bits to backups that a Plesk backup may make which aren’t in this article.
Am I a Hacker? is that what I am? (we’ll see to that later). Anyway, every time I need to sort something out quick, I always use Perl.
I consider myself knowledgeable enough to create any sort of scripts when it comes down to it.
One of my early introduction to Perl was when I started to work on Unix workstations, this led me to learn vi which is the best editor if you want to work fast and quick (it is somehow considered more geeky than Emacs, which, to be honest has never been my Favourite), with vi I started to write c-shell scripts, mostly to automate mundane activities such as formatting floppy disks and other things like that, basically these scripts where extensively using switches, sed, awk and other echo commands (if I can recall).
When the web started to emerge, you could indeed use c-shell scripts to create applications for it (you still can), as a matter of fact I probably did, or worked on someone’s c-shell cgi-script. However Perl was always better for that as you had far more power to do things fast. You can condense Perl commands to a one liner if you’re prepared to optimise your code. A few years ago I managed to reduce a whole lot of Perl lines to one, single command, I was dead chuffed.
Anyway in the upcoming blogs I will recall some these scripts and show how these work.
Perl is great for Unix/Linux SysAdm too!
Anyway, I have though about it, I am not a hacker, I know too little about Perl to qualify. Still can write things that help me though. Some of them are actually profitable. So my examples may probably look “lame” for most Perl Experts as I adopt quite a loose attitude to TMTOWTDI.