Sorting the Email Sending Nightmare [ESN]

The one thing I have always been struggling with for the past decade: Sending emails from my own servers

This never ending saga is the result of the openness of the email sending protocol; it is based on trust and is transparent, because of this, it has become the number one method to reach anyone, very easily and quickly, as it was intended.

The idea was genius and obvious, so obvious in fact that now, anyone can send anything to everyone, very fast without consequences and at virtually no cost.

If you don’t understand where I am getting with this I shall make it plain and simple to understand: SPAMMERS

This has created a monumental problem, and spammers don’t care as long as they can sell to one in a million, send to 500’000’000 emails, get 500 responses, sell for $100.00, get it?

That is a problem the industry has been facing for the last 30 years and showing no signs of abating, therefore using various tools to identify the originator of an email message is the only way to at least mitigate the great flood of electrons down the great internet, these tools are checking that the:

  • Sender of the email is who they say they are (SPF)
  • Server sending the message is belonging to said sender (DKIM)
  • Message header contains the two things listed above in the correct way combined with a valid DNS on said server and domain (DMARC)
  • Message is not junk (SPAM or no SPAM?)

As far as I can tell, I think this is how it is supposed to work. But I never had any luck with successfully implementing the whole thing. For example, I have enormous problem trying to send emails to the Microsoft network comprising, outlook.com, live.com and hotmail.com. Yet when I report the issue to Microsoft Ticketing system, I always get a response basically telling me that there’s nothing “off hand” as they call it to prevent my messages getting through (more on this later).

The other problem I also have started to discover is that the rejected emails one is getting from the recipient’s mail server is pretty generic and does not seem to tell much of what exactly is the problem if at all. It’s just “a problem” and one needs to “figure it out”.

The other thorny aspect is IPV6, which is another problem altogether! So I have turned off IPV6 on my servers until I have time and resources to debug this problem also.

Lucky break

Only just recently I stumbled upon a very useful website that allows me to send an email and check what is going on with it and potentially why I struggle to send it to MSDN (the Microsoft network), so much so that, after many, many tweaks, I finally managed to send an email through to MSDN (albeit flagged as spam) nevertheless IT WENT THROUGH, HURRAY!!

The Mail-tester.com website is a godsent in my book
My Savior in the sea ocean of spam

Send them an email (free to send 5 messages per day, which was almost sufficient), see what wrong, fix and there you have it, 10/10 message quality!

The steps

Once you know what you need to do to fix your email sending problems, as long as your IP is not Blacklisted, bob’s your uncle.

Below are the required elements to ascertain your email sending cleanliness.

This Howto is for my own system which is made of Linux (Ubuntu) LAMP webservers managed via Webmin/Virtualmin and I outsource all my DNS with my Registrar (Namecheap).

Other setups will invariably be somewhat different, however I am suspecting that, should you be using Plesk or other similar Control panel systems, most of these issues might be already setup by default ( I know by experience at least with Cpanel it was less a problem) especially when you get a complete package from, say a registrar like Namecheap, as you’d expect them to have done it for you.

In my case, I like to go commando, by not relying on others to do the leg work, the onus is then on you to get it working, something that Virutalmin on an un-managed server gives you plenty of reasons to walk miles. But, as I said, once you know what to do it is relatively simple to enable your server to send clean emails to most networks.

Starting situation

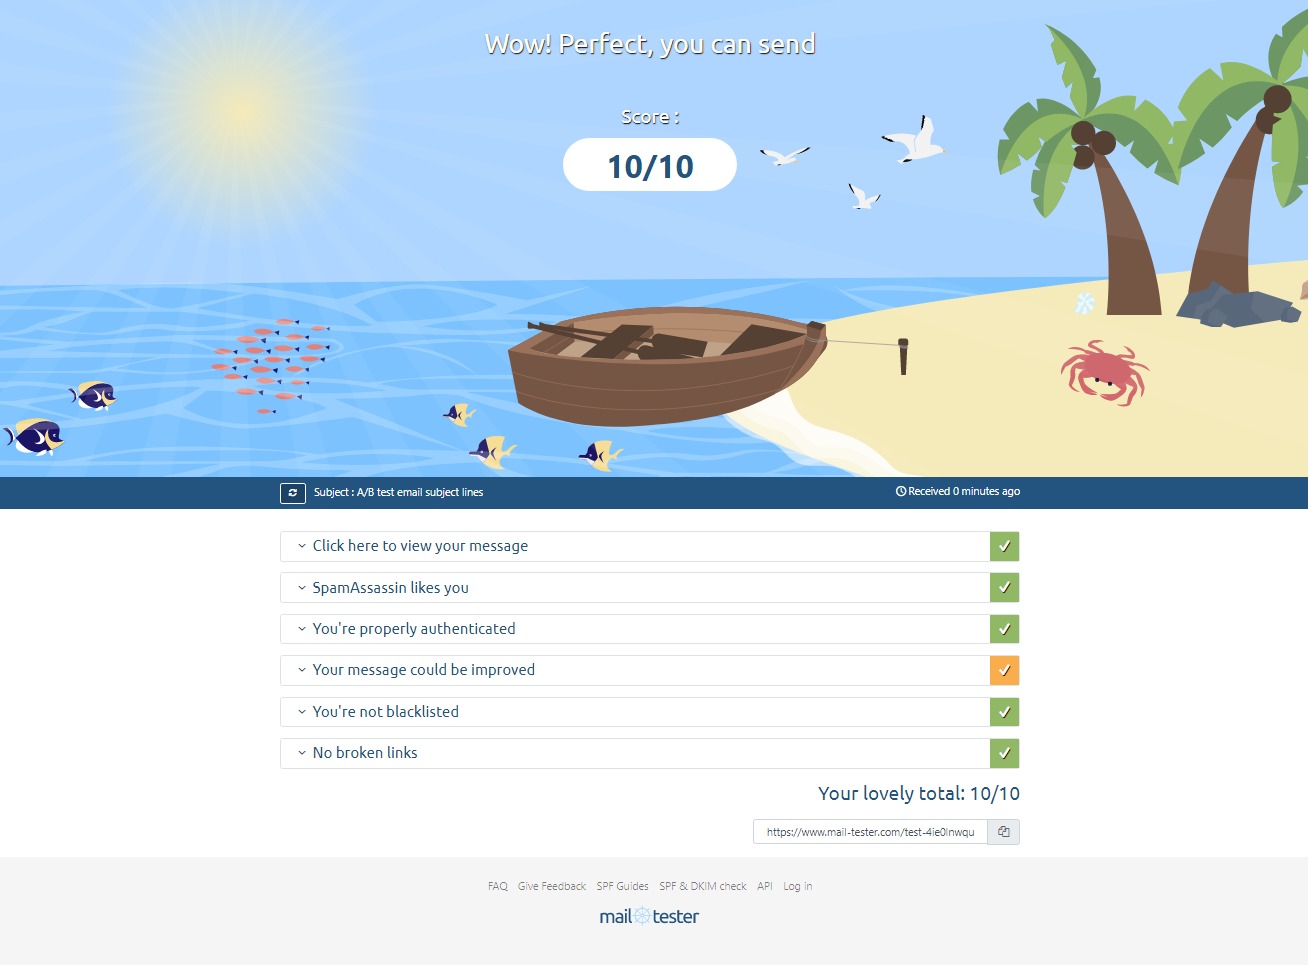
This is the test result when setting up a mail box on one of my servers, it gives an idea of the sort of score you can expect from a default config on a Virtualmin Server

Not a shining report

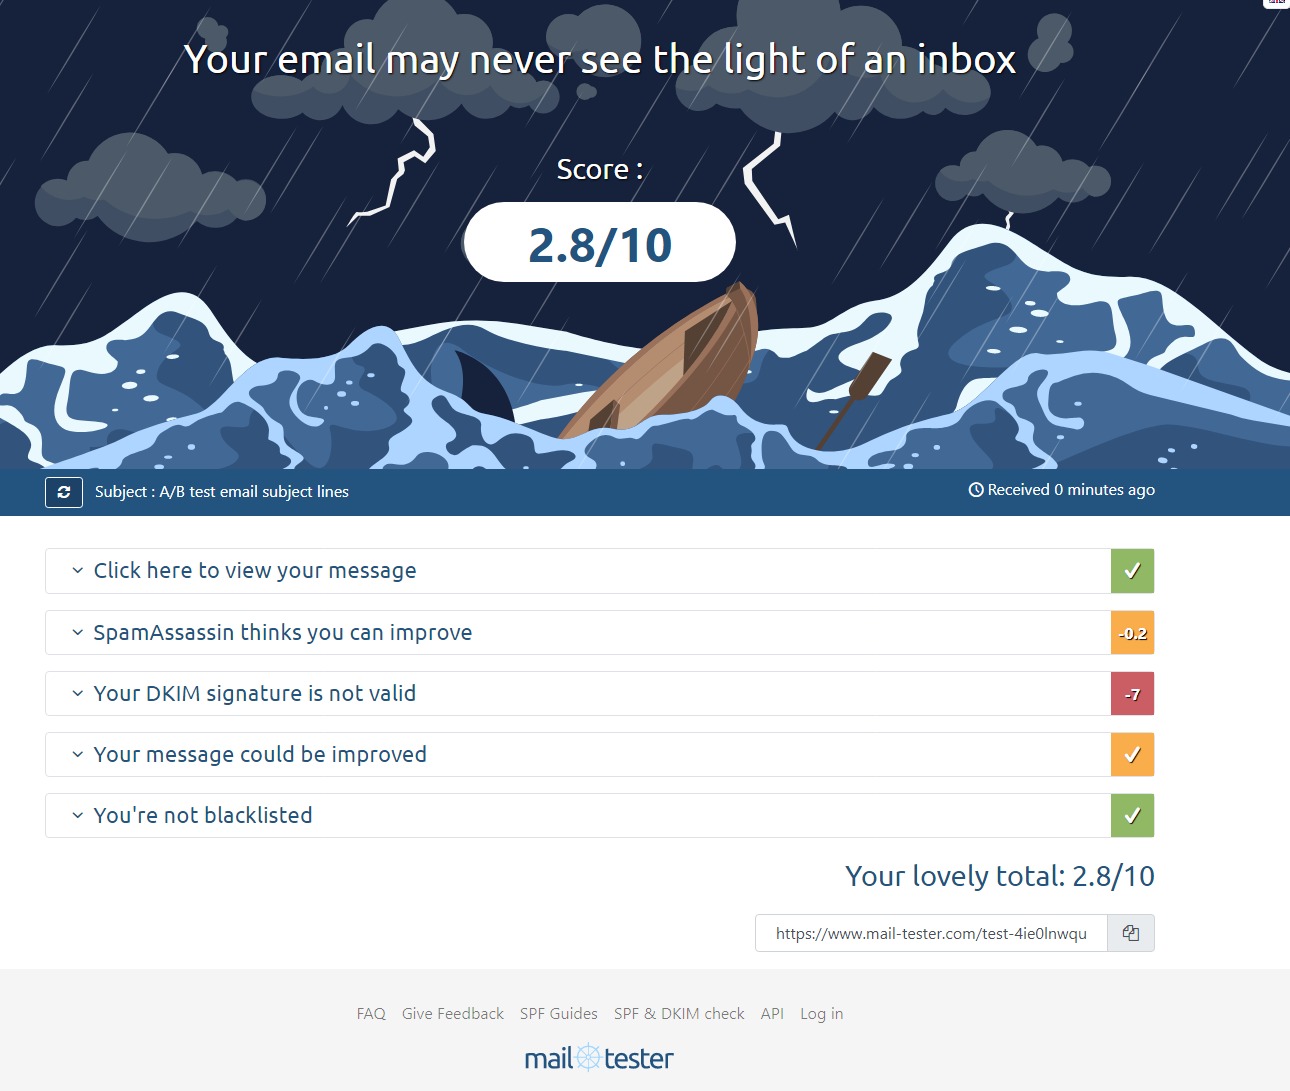
In more details in the screenshot below, one can see one of the main issue; DKIM, the other negative scoring is related to the MX record, as I just set it up for this test it might need to be propagated before the error is fixed.

DKIM is at a loss here…

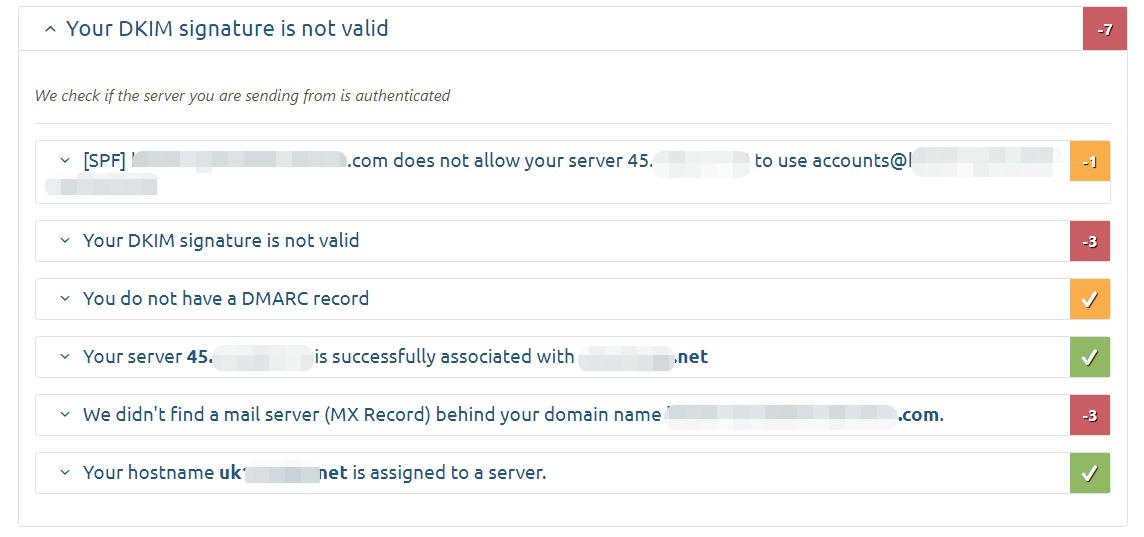
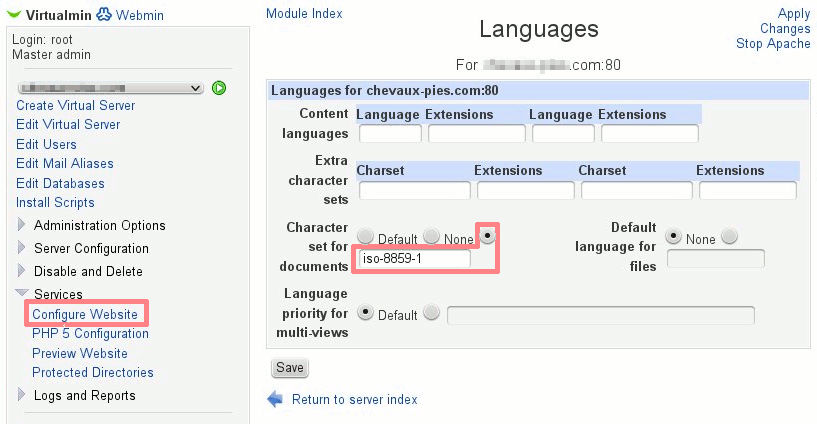
So let’s get DKIM fixed for this domain by loading the website configuration and making the necessary changes to make DKIM work.

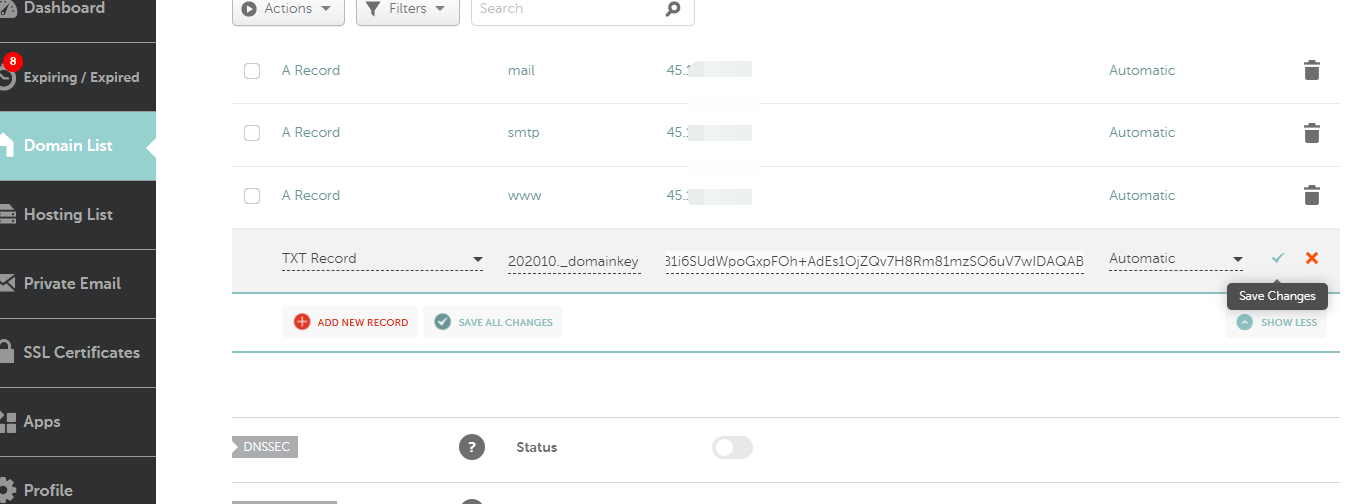
In the screenshot below it is already put in place by default for the whole server, we can therefore leave it as is, unless one wants to change the key…

The current default DKIM is all good to be used

So the next step is to edit the domain DNS record appropriately, by going on the registrar’s website of the domain and add the correct entry to the DNS record.

add and save DKIM public key

Lastly, it is also necessary to add the SPF and possibly the DMARC record for this domain, the default value is usually okay, depending if DNS is enabled or not, Virtualmin will provide a list of recommended DNS records under the “Server
Configuration -> DNS records” for that domain :

{domain}.	IN	TXT	"v=spf1 a mx a:{domain} ip4:{xxx.xxx.xxx.xxx} ?all"

Where {domain} and {xxx.xxx.xxx.xxx} are the values to edit for the specific domain/IP

Once this is in place, validate the DNS, wait a little and re-test.

Much better

I almost got it right, there is just a little issue with the MX record, but I think that It will get resolved pretty quickly, whilst I was at it I also edited the DMARC record:

_dmarc{domain}.	IN	TXT	"v=DMARC1; p=quarantine; pct=100; ruf=mailto:postmaster@{domain}; rua=mailto:postmaster@{domain}"
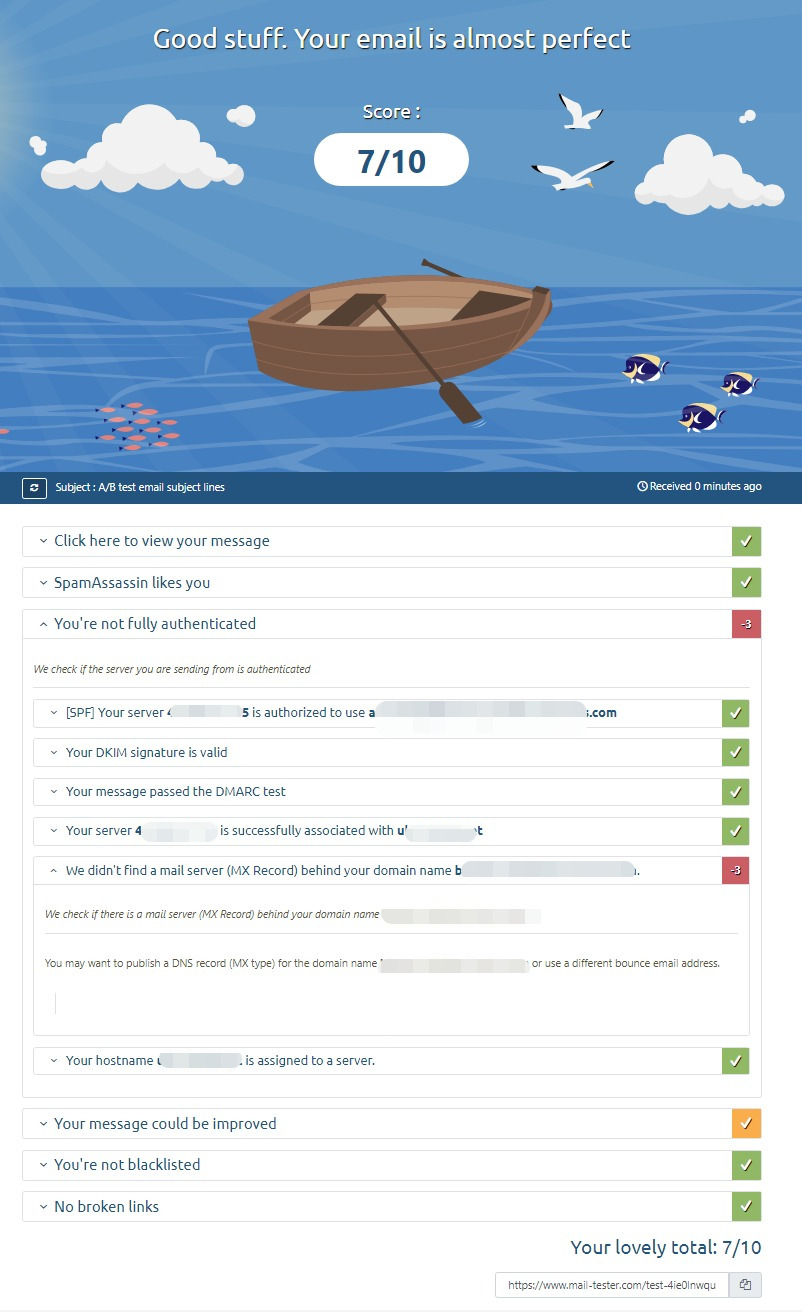
Last test

Once all these records are correctly set up. it is time to re-run the test, and, lo and behold!

Perfection.

The final hurdle is to test if the emails are making it through the dreaded OUTLOOK.COM address?

Nope :-P, oh well, apparently it is down to my Provider IP range being black listed, they tried to help but it has never worked, ultimately they recommended me to use SMTP2GO, I tried it and it works, but the point remains that I have a problem sending from one of my servers.

Use it if you cannot send emails after all these efforts

Conclusion

To conclude, I have actually learned something useful and am now confident that email deliver-ability issues I was facing without any clue as to why and simply gave up, are now easily fixable! Thank you Mail tester!

For more resources regarding setting up your own Web server using Virtualmin and what you need to check before starting, read my older post here more particularly the “Next Steps” section…


Addendum

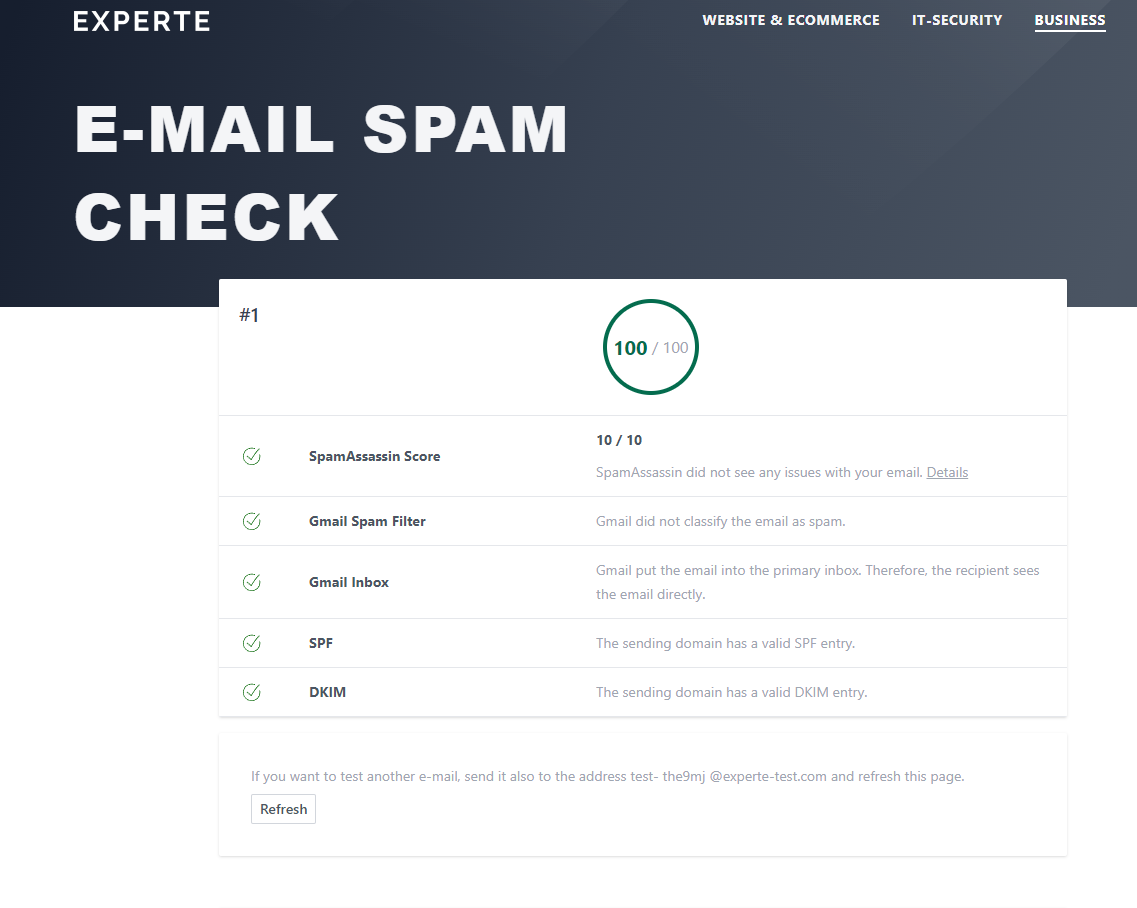
I recently received an emaile regarding this post from Janis von Bleichert over at experte.com, they have developed a upgraded version of the mail-tester system, as he put it :

Like the original, it uses well-known spam filters and blacklists to check the spam score of a mail. But in addition, it also checks whether Gmail classifies the email as spam and into which inbox the mail is placed. Since Gmail is the world’s most used email provider, a positive assessment is critical for deliverability. In the last step, the tool also checks the correct configuration of the SPF and DKIM records.

A screenshot of Janis’s system in action

Thanks to Janis to bring this useful tool to my attention,

How to setup same DKIM settings for multiple (virtualmin) servers

You already have one server with a dkim key pair and use virtualmin “DomainKeys Identified Mail”:

  1. Edit the dkim option on the source server and add the new domain (I personally use sub domains for all my servers) so for example if your initial mail server is s1.domain.com and your new server (the one you will copy the dkim key on) is s2.domain.com your “Domains to sign for” section must contain:

s1.domain.com

s1

s2.domain.com

s2

  1. Save this on the source server. The key will be updated….
  2. The private key on my ubuntu server is filed under: /etc/dkim.key
  3. If your target server is the same [OS], first of all proceed to enable DKIM on the virtualmin “DomainKeys Identified Mail”, you may want to use the same details than the source server in the “Domains to sign for” section & “Save”, this will create the key pairs.
  4. I personally then disabled dkim on the TARGET server before doing the next step, but it might not be required(!?).
  5. When complete, edit the /etc/dkim.key on the TARGET server with vi or otherwise replace the private key with the one from the SOURCE server (you should make a backup of the file first, always do a backup!).
  6. Go back to the virtualmin “DomainKeys Identified Mail” in the TARGET server page and enable the dkim outgoing email but with the option “Force generation of new private key?” to “NO” and “Save”

The private key will then be read from the /etc/dkim.key and used to generate the exact same public and DKIM DNS records for domains as the source server together with all the required settings to make it work.

You’re all set and the DNS can be edited if the DKIM DNS records for domains has changed, mine does not seem to have.

Synchronisation between two Virtualmin servers

When, like me, you get paranoid to losing your data or web server functionality…

I have created a little perl script to allow the synchronization of MySQL databases and /home between my Webservers.

The master server (where the script runs from) is the main production server, the salve server is on standby just in case.

I can appreciate that the passwords are clearly inserted in the script and it is a security issue. Nonetheless, I am the only admin and no other users have ftp or other privileges on both servers. I am sure that there is a way to prevent this but I am happy with the current situation and, obviously I am also making a regular backup of the master server on an external backup provider (I use rsync.net).

#!/usr/bin/perl
# Performs a synchronisation of home folder and dumps sql databases 
# from one Virtual server to another using rsync and secure shell 
# 
# Written by G.Serex Sharpnet UK (c) 03.12.2020 

# Var definitions 

############### SQL Config ############# 
# SQL root username 
$username = "root"; 
# Local SQL root password 
$password = "localmysqlpassword"; 
# Remote SQL root password 
$rpassword = "remotemysqlpassword"; 
# The dumped files path . (absolute path + trailing / please) 
$dumped_dbs_path = "/root/mysql/"; 
# The dumped file name 
$dumped_db = "dump.sql"; 
# Name of the database to exclude from the dump (here the mysql and sys are obviously dedicated to each server, so don't dump them!) 
$exclude_database = "mysql,sys,information_schema,performance_schema"; 

################ SSH Config ################# 

# The remote host name 
$remotehost = "ipaddress"; 

#The ssh username 
$sshusername = "root"; 

#The ssh port 
$sshport = "xx"; 

#____ E N D _ V A R _ D E F S. ________________ 

# First check and optimise the lot.

# A little house keeping 
system("/usr/bin/mysqlcheck --optimize --all-databases --auto-repair -u $username -p$password"); 

# Dump the dbs 
system("/usr/bin/mysqlpump -u $username -p$password --exclude-databases=$exclude_database --add-drop-table --result-file=$dumped_dbs_path$dumped_db"); 

# Transfer them abroad 
system("/usr/bin/rsync -avz -e 'ssh -p $sshport' $dumped_dbs_path $sshusername\@$remotehost:$dumped_dbs_path"); 

# Restore the dump abroad 

system("/usr/bin/ssh -p $sshport $sshusername\@$remotehost 'mysql -u root -p$rpassword < $dumped_dbs_path$dumped_db'"); 

# rsync the home directory 

system("/usr/bin/rsync -avz --delete -e 'ssh -p $sshport' /home/ $sshusername\@$remotehost:/home"); 
exit;

Plesk 11 to VM – Part 3: Customisation and migration

Intro

In this series of Best Practice articles I talk about migrating websites and emails from a Plesk 11 run server to a Virtualmin run server. It describes in details the steps involved, including the eventual pitfalls and other thing I came across whilst doing it. Note that this documentation is addressed to people with medium expertise in linux/system administration.

Useful customisation

Most of VM defaul settings are fine, however in order to make it a little easier to migrate websites, the following mods are useful.

Server Template – Apache directives

As Plesk websites are hosted under $Documentroot/httpdocs this can be set by default before creating website by editing the Apache website default config:

VM Menu > Server Templates > Default Settings > Edit template section: apache website

Change: DocumentRoot ${HOME}/public_html
To: DocumentRoot ${HOME}/httpdocs

Change: <Directory ${HOME}/public_html>
To: <Directory ${HOME}/httpdocs>

Under “Users’ website subdirectory to create“.

Change: Default (public_html)
To: [httpdocs]

Account Plans

One may customise them to match previous Plesk hosting “plans”, however this is not mandatory.

Virtual website creation – Admin username

The only requirement in this process is to create the Administration username as a “Custom username” giving it the domain.tld name (i.e. mydomain.com). This way the websites paths will end up being: /home/domain.tld, which makes it easier to do a path change from /var/www/vhosts to /home wherever there are scripts configurations containing full paths.

Perl

I am a perl script writer thus I use perl extensively, over the years I have created scripts that require a few additional modules. I shall not go into details with them (yet), however there’s an important bit I must mention, some perl scripts I use have a different #!. Some point to the sometimes non-existent /usr/local/bin/perl, so in order to avoid these script throwing an error I simply link it to the whereis perl (usally /usr/bin/perl or /bin/perl):

ln -s /usr/bin/perl /usr/local/bin/perl

Website content transfer

To transfer website content from Plesk to VM it is a matter of rsyncing each website with the rsync command,  to minimise the load, the following commands are run at nice 20 from the source server, note that the target server must have the virtual server already configured prior to doing this, otherwise an error will be thrown:

rsync -avz --rsh='ssh -p{port}' /var/qmail/mailnames/{domain}/{user}/  root@{server}:/home/{domain}/homes/{user}/

Where:

  • port is the ssh port (if different than 22, which is recommended for security)
  • domain is the domain to be transferred
  • target is is the target server IP or domain

Depending on the size of the website this might take some time. Note that I am not really needing to transfer statistical information over. most if not all the required files are under httpdocs and cgi-bin in my case.

After the transfer, on the target server, ownership of the directories must be set:

chown -R {username}:{username} /home/{domain}/httpdocs /home/{domain}/cgi-bin

Where:

  • username is the owner of the httpd and cgi-bin content (in my case I created a username matching the domain, making it easier to find the correct directory under /home when working over the CLI.
  • domain is the domain

Email content transfer

The operation of transferring emails to the target server are pretty much the same as website transfer, with a couple of exceptions.

nice -20 rsync -avz --rsh='ssh -p{port}' /var/qmail/mailnames/{domain} root@{target}:/home/{domain}/home/

Where:

  • port is the ssh port (if different than 22, which is recommended for security)
  • domain is the domain to be transferred
  • target is is the target server IP or domain

After the transfer, on the target server, ownership of the directories must be set:

IMPORTANT: note user is user.domain (not just domain)

chown -R {user}.{domain}:{domain} /home/{domain}/homes/{user}/

Where:

  • user is the name of the user
  • domain is the name of the domain

IMAP changes (At client level, here using Thunderbird)

Server name: no change
Username: replace @ with .
Connection security: from SSL/TLS to STARTTLS
Authentication method: from encrypted password to normal password

SMTP changes (At client level, here using Thunderbird)

Server name: no change
Port from 25 to 587
Connection security: from SSL/TLS to STARTTLS
Authentication method: from encrypted password to normal password
Username: replace @ with .

Database content transfer

Source server

mysqlcheck --optimize {database} --auto-repair  -uadmin -p`cat /etc/psa/.psa.shadow`
mysqldump -uadmin -p`cat /etc/psa/.psa.shadow` --flush-logs --opt {database} > {database}.sql

Where:

  • database is the database name

Target server (after rsyncing all the dbs dumps on it)

VM Menu > Edit Databases > (manage current database usually called {domain}_{tld}) or create a new one if required.
click Manage …
Click Execute SQL
Run SQL from file Tab
From local file (browse to file)
Click Execute

Special characters

Sites  with accents (like French’s)

The charset must be edited in the following Module:

Select Domain > Menu > Services > Configure Website > Languages >  Character set for documents     (x) iso-8859-1

Save, apply changes.

languages

Plesk 11 to VM – Part 1: Why move?

Intro

In this series of Best Practice articles I talk about migrating websites and emails from a Plesk 11 run server to a Virtualmin run server. It describes in details the steps involved, including the eventual pitfalls and other thing I came across whilst doing it. Note that this documentation is addressed to people with medium expertise in linux/system administration.

Fed up with Plesk?Fed up with Plesk?

Since  2003 I have been using two brands of Dedicated Servers Control Panels: Ensim (RIP) and Plesk. So it’s died 🙁 oh well, Ensim was an awful CP, never liked it, I liked Plesk (from 8 to 11) a bit more and it has been my selected Control Panel for many years. However the time has come to make way for a relatively new comer: Virtualmin or VM for short, a very mature and simpler CP indeed with a vibrant Community.

Deciding to select another Control Panel is a big decision, especially when your bottom line is at stake, so after having extensively tested and used VM for the last few months I finally decided to make the move, VM is slick, simple and easy to use, it’s like Ronseal, it does what it says on the tin.

Continue reading Plesk 11 to VM – Part 1: Why move?

Plesk 11 to VM – Part 2: Bare server set up

Intro

In this series of best practice articles I talk about migrating websites and emails from a Plesk 11 managed server to a Virtualmin managed server. It describes in some details the steps involved in doing it remedy the pitfalls and other things I came across whilst doing it. Note that this documentation is address to people with medium expertise in linux/system administration.

Hardware

A fresh install of a super fast multi-core web server with sufficient RAM and [Hardware] RAID 1 partitioned as follow: Continue reading Plesk 11 to VM – Part 2: Bare server set up

Yum clamav upgrade broken on virtualmin VPS

I got a vps with virtualmin installed, I recently upgraded clam antivirus using webmin/virtualmin, this resulted in the clamd failing to start.

After some research it turns out that I am running clamd with user clam instead of clamav. Yet yum upgrades clam with the user clamav and other directories in the configuration;

In short here is what I experienced after the upgrade (these must be changed back into the /etc/clamd.conf file): Continue reading Yum clamav upgrade broken on virtualmin VPS

Primary Default Website in Virtualmin (Apache)

When no virtual websites are in existence, The Apache web server will point to /var/www/html and /var/www/cgi-bin in a base install of Virtualmin (the default). However when a Virtual website is created, this changes to the first available virtual site, so for example, if the hostname is some.domain.com and no virtual sites are configured, typing this URL in a browser will serve the content in /var/www/html. If a virtual site called virtualsite.com is created, the same request will serve the content of /home/virtualsite/public_html.

By design this is normal

Whilst this is the way Apache is designed and there’s nothing wrong with that, it becomes a problem when some applications are only available outside the virtual server realm (i.e. not suexec’ed). For example the server has Nagios or Munin installed and you want to be able to access it even after a virtual server has been created. The solution is to manually create the first virtual server and call it the same as the server hostname (some.domain.com).

Continue reading Primary Default Website in Virtualmin (Apache)

SSL smtp on Virtualmin

By default, virtual servers aren’t setting up SMTP to use SSL. Following this information regarding SSL SMTP I am just summarizing:

 netstat -an | grep :465

Returns nothing, so.

vi /etc/postfix/master.cf

find the lines:

#smtps inet n - n - - smtpd
# -o smtpd_tls_wrappermode=yes
# -o smtpd_sasl_auth_enable=yes
# -o smtpd_client_restrictions=permit_sasl_authenticated,reject
# -o milter_macro_daemon_name=ORIGINATING

And uncomment them:

Continue reading SSL smtp on Virtualmin

index.shtml and #include virtual in Virtualmin

For some reason the default virtualmin install does not have index.shtml in the Directoryindex directive. To enable it, one must edit the directive:

Virtualmin > Services > Configure Website > Edit Directives 

Find the following line:

DirectoryIndex index.html index.htm index.php index.php4 index.php5

Add index.shml at the end  of the line:

DirectoryIndex index.html index.htm index.php index.php4 index.php5 index.shtml

Click “Save” then “Apply Changes” (on the top right hand side of the “Virtual Server Options” page). Checking your virtual website will show the index.shtml page.

To make it a default configuration

In order to enable  this for all further virtual websites:

Continue reading index.shtml and #include virtual in Virtualmin