The story begins in March 2025, the first steps was to check if the car would fire up. Obviously the battery was totally dead and had to be replaced.
First thing first, replace the battery and try to start it. Result: lights came up in the car and upon trying to start the car, smoke started to billow out of the engine bay.
Suspect No 1: alternator, proceeded to disconnect it and the smoke stopped.
After replacing the alternator, the long process to clear all the DTC (Diagnostic Trouble Codes) started. As the car had sat for 9 years in all sorts of weather, luckily under a partial roof, it was not too bad, however the level of corrosion, especially in the ECU box located in the plenum at the back of the engine firewall, was major.
The main error was linked to the transmission and brakes system. Mainly caused by water ingress and connectors corrosion, I checked and dried the ECU box, protected it somehow from further water ingress – on a a side note – why would the engineers at Audi design a system that is right where most of the water coming from the windsrceen would end up flooding this plenum is difficult to understand. If so, make sure that the box is providing a very good seal, which is not the case; it merely is splash proof at best.
Other items that were found not working well or at all:
Alternator shorted
Windscreen wipers motors dead
Wing mirrors folding not proper operation (since stopped working all together)
Transmission (mainly contacts and ABS fault related)
Rear brakes calipers seized
First Start
The first start was epic. But I was far from “start up and go”, the next few months would be quite challenging, the first major step was to move the car from the car port as I needed to repair the roof. So I hired a trailer and moved it to my home.
You know, sometimes in life, opportunities come your way, and you just can’t let them slip by. This is one of those stories.
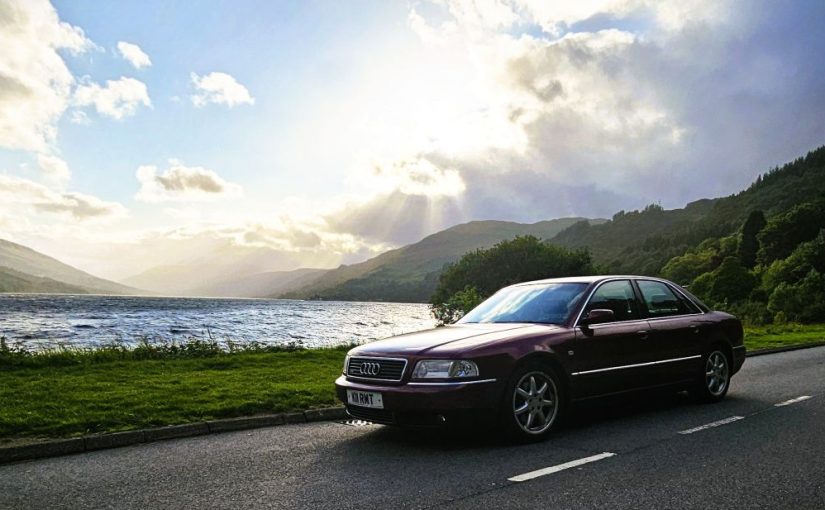
When an old luxury limousine that had been sitting idle for nearly 10 years due to its owner’s health issues comes into view, it’s tough to say no. This car belonged to a valued customer, and I had my eye on it ever since I first saw it back in 2015 when I started working for him. Even though it looked a bit outdated, I didn’t realise just how special this rare vehicle was at the bottom of its depreciation curve.
Originally purchased in 2001, a car that would be worth £100,000 today seemed like a steal, especially since I knew I could fix it up and restore it to its former glory, 25 years later.
In 2024, his widow reached out to me for some additional work on the property, one of which was to renovate the deteriorating carport roof. When it came time to move the car to get the job done, I asked if they had any plans for it, and they said it “had to go.”
I expressed my interest in taking the vehicle off their hands and asked what they wanted for it. They told me to make an offer, so I did, and they accepted it right away.
Then began a saga of smoke, corroded wiring, and parts replacements over the next five months… and it’s still ongoing. My partner was not pleased at all, as she was really upset that I prioritised this project over other commitments we had supposedly agreed to tackle that year.
I just couldn’t bear the thought of letting this “ugly” car go to scrap, especially since it had a 3.7-litre V8 engine with only 60,000 miles on it, all for the low price of £500.00.
How to install Lets encrypt certificate on Cpanel (Namecheap Stellar Shared Hosting) when the main domain is hosted elsewhere?
For the last year or so, I have been using Namecheap Shared Hosting as a test bed, mostly to have a redundancy in case my VPS goes woosh, and secondly because I suffer huge problem with email delivery from my VPS, so for the last year I also used Zoho Mail to manage my handful of clients’s emails.
Zoho is great for emails, less so for simplicity; it is an overly complicated system to navigate. Trying to change the main user admin emails is a nightmare and my wife was less than impressed when she was getting emails from zoho about the admin account, she was the first user on the zoho mail service and I never ever managed to be able to change the config to reflect this.
Anyway, I ramble on.
Namecheap Shared Hosting
Due to the fact that over the last few years I have had less and less websites to manage and more and more email problems to deal with, I decided to give them a shot as I already use them to managed my Domains.
The Stellar package offers “unlimited” space (but it comes with a caveat). for a reasonnable cost and hosted in the EU so why not.
It was my first dab at using Cpanel and I can’t say I hate it. As you may know I am a Virtualmin user on my VPS.
In 2024 I used it mainly for testing and emails management only. Which was fine.
SSL certificates
Namecheap have a sneaky way to add value to their offering by throwing in a “free” SSL certificate for each domain you host on their servers, bit only for the first 12 months, after that, it’s no longer free.
As a user of Lets Encrypt on the VPS which Virtualmin pretty much automates, I was not going to renew their certificates at any costs?!
Where “{folder}” is the document root of your website
But! My website is hosted on another server, and letsencrypt can do that, I simply have to issue a certificate for each servers, as it checks the location of a file to validate the domain, I cannot issue a certificate for a subdomain that is not present on the main server with poor email reputation.
Step one:
Namecheap DNS setup is very convenient when using the Shared hosting’s Cpanel Zone editor. All I need to do is tell the zone the IP of my website!
The top domain point to the VPS, the rest to Cpanel
Step two:
Physically create a subdomain on the Cpanel, to allow the certificate to be installed ONLY for this sub domains (here it is mail.serex.me)
In Cpanel, go to the “Domains” section and click on Create A New Domain. Enter the subdomain name (here “mail.serex.me”) and provide the document root to be the same as a TLD (e.g., “/home/{user}/serex.me”). where {user} is the Cpanel username, which also is the folder name where all the stuff is stored for your hosting.
Step three:
Once the certificate is issued and present on the Cpanel:
(if the certificate is not showing repeat the last acme.sh command above once again it seems that the certificate is not showing up unless the command “acme.sh –deploy” is given twice)
Select the sub domain certificate in the pop up
select the right one.
The domain field will be pre populated with the mail.serex.me domain already.
Click on “Install Certificate”
To verify that the certificate is correctly installed:
Click on the “certificate details” on the “Manage SSL Sites” page. if the certificate is not issued by “Zero SSl”, but rather by Namecheap default “Sectigo” you get for free for a year:
Scroll to identify the correct certifcate for your site and click “install”. Verify the Form is correctly allocated with the right domain etc, and click “Install Certificate”.
This will install and replace the Namecheap “default “free for a year only” Certificate with the Zero SSL (Lets Encrypt) one. No need to worry
Also note that the mail.serex.me sub domain will show the content of the site root added when creating the domain, so a redirect may be necessary unless you don’t mind having a folder listing.
All good and no errors when hooking up your mail client!
The one thing I have always been struggling with for the past decade: Sending emails from my own servers
This never ending saga is the result of the openness of the email sending protocol; it is based on trust and is transparent, because of this, it has become the number one method to reach anyone, very easily and quickly, as it was intended.
The idea was genius and obvious, so obvious in fact that now, anyone can send anything to everyone, very fast without consequences and at virtually no cost.
If you don’t understand where I am getting with this I shall make it plain and simple to understand: SPAMMERS
This has created a monumental problem, and spammers don’t care as long as they can sell to one in a million, send to 500’000’000 emails, get 500 responses, sell for $100.00, get it?
That is a problem the industry has been facing for the last 30 years and showing no signs of abating, therefore using various tools to identify the originator of an email message is the only way to at least mitigate the great flood of electrons down the great internet, these tools are checking that the:
Sender of the email is who they say they are (SPF)
Server sending the message is belonging to said sender (DKIM)
Message header contains the two things listed above in the correct way combined with a valid DNS on said server and domain (DMARC)
Message is not junk (SPAM or no SPAM?)
As far as I can tell, I think this is how it is supposed to work. But I never had any luck with successfully implementing the whole thing. For example, I have enormous problem trying to send emails to the Microsoft network comprising, outlook.com, live.com and hotmail.com. Yet when I report the issue to Microsoft Ticketing system, I always get a response basically telling me that there’s nothing “off hand” as they call it to prevent my messages getting through (more on this later).
The other problem I also have started to discover is that the rejected emails one is getting from the recipient’s mail server is pretty generic and does not seem to tell much of what exactly is the problem if at all. It’s just “a problem” and one needs to “figure it out”.
The other thorny aspect is IPV6, which is another problem altogether! So I have turned off IPV6 on my servers until I have time and resources to debug this problem also.
Lucky break
Only just recently I stumbled upon a very useful website that allows me to send an email and check what is going on with it and potentially why I struggle to send it to MSDN (the Microsoft network), so much so that, after many, many tweaks, I finally managed to send an email through to MSDN (albeit flagged as spam) nevertheless IT WENT THROUGH, HURRAY!!
My Savior in the sea ocean of spam
Send them an email (free to send 5 messages per day, which was almost sufficient), see what wrong, fix and there you have it, 10/10 message quality!
The steps
Once you know what you need to do to fix your email sending problems, as long as your IP is not Blacklisted, bob’s your uncle.
Below are the required elements to ascertain your email sending cleanliness.
This Howto is for my own system which is made of Linux (Ubuntu) LAMP webservers managed via Webmin/Virtualmin and I outsource all my DNS with my Registrar (Namecheap).
Other setups will invariably be somewhat different, however I am suspecting that, should you be using Plesk or other similar Control panel systems, most of these issues might be already setup by default ( I know by experience at least with Cpanel it was less a problem) especially when you get a complete package from, say a registrar like Namecheap, as you’d expect them to have done it for you.
In my case, I like to go commando, by not relying on others to do the leg work, the onus is then on you to get it working, something that Virutalmin on an un-managed server gives you plenty of reasons to walk miles. But, as I said, once you know what to do it is relatively simple to enable your server to send clean emails to most networks.
Starting situation
This is the test result when setting up a mail box on one of my servers, it gives an idea of the sort of score you can expect from a default config on a Virtualmin Server
Not a shining report
In more details in the screenshot below, one can see one of the main issue; DKIM, the other negative scoring is related to the MX record, as I just set it up for this test it might need to be propagated before the error is fixed.
DKIM is at a loss here…
So let’s get DKIM fixed for this domain by loading the website configuration and making the necessary changes to make DKIM work.
In the screenshot below it is already put in place by default for the whole server, we can therefore leave it as is, unless one wants to change the key…
The current default DKIM is all good to be used
So the next step is to edit the domain DNS record appropriately, by going on the registrar’s website of the domain and add the correct entry to the DNS record.
add and save DKIM public key
Lastly, it is also necessary to add the SPF and possibly the DMARC record for this domain, the default value is usually okay, depending if DNS is enabled or not, Virtualmin will provide a list of recommended DNS records under the “Server Configuration -> DNS records” for that domain :
{domain}. IN TXT "v=spf1 a mx a:{domain} ip4:{xxx.xxx.xxx.xxx} ?all"
Where {domain} and {xxx.xxx.xxx.xxx} are the values to edit for the specific domain/IP
Once this is in place, validate the DNS, wait a little and re-test.
Much better
I almost got it right, there is just a little issue with the MX record, but I think that It will get resolved pretty quickly, whilst I was at it I also edited the DMARC record:
_dmarc{domain}. IN TXT "v=DMARC1; p=quarantine; pct=100; ruf=mailto:postmaster@{domain}; rua=mailto:postmaster@{domain}"
Last test
Once all these records are correctly set up. it is time to re-run the test, and, lo and behold!
Perfection.
The final hurdle is to test if the emails are making it through the dreaded OUTLOOK.COM address?
Nope :-P, oh well, apparently it is down to my Provider IP range being black listed, they tried to help but it has never worked, ultimately they recommended me to use SMTP2GO, I tried it and it works, but the point remains that I have a problem sending from one of my servers.
Use it if you cannot send emails after all these efforts
Conclusion
To conclude, I have actually learned something useful and am now confident that email deliver-ability issues I was facing without any clue as to why and simply gave up, are now easily fixable! Thank you Mail tester!
For more resources regarding setting up your own Web server using Virtualmin and what you need to check before starting, read my older post here more particularly the “Next Steps” section…
Addendum
I recently received an emaile regarding this post from Janis von Bleichert over at experte.com, they have developed a upgraded version of the mail-tester system, as he put it :
Like the original, it uses well-known spam filters and blacklists to check the spam score of a mail. But in addition, it also checks whether Gmail classifies the email as spam and into which inbox the mail is placed. Since Gmail is the world’s most used email provider, a positive assessment is critical for deliverability. In the last step, the tool also checks the correct configuration of the SPF and DKIM records.
A screenshot of Janis’s system in action
Thanks to Janis to bring this useful tool to my attention,
After that, be prepared to get a lot of emails about the blocked IPs for the set time (default is 3600 seconds or 1 hour). They eventually taper out with the most offending IP’s getting permanently blocked 🙂
Not going to talk in details about these two pieces of regulation other that it is a waste of my and everyone else time, like Europe, the Euro and all that jazz, good idea on paper, but forget it. is is useless and just a waste of time and money, I have ignored both and one is already dead, looking forward to have the GDPR dead soon too.
In this series of Best Practice articles I talk about migrating websites and emails from a Plesk 11 run server to a Virtualmin run server. It describes in details the steps involved, including the eventual pitfalls and other thing I came across whilst doing it. Note that this documentation is addressed to people with medium expertise in linux/system administration.
Useful customisation
Most of VM defaul settings are fine, however in order to make it a little easier to migrate websites, the following mods are useful.
Server Template – Apache directives
As Plesk websites are hosted under $Documentroot/httpdocs this can be set by default before creating website by editing the Apache website default config:
VM Menu > Server Templates > Default Settings > Edit template section: apache website
Change: DocumentRoot ${HOME}/public_html
To: DocumentRoot ${HOME}/httpdocs
Change: <Directory ${HOME}/public_html>
To: <Directory ${HOME}/httpdocs>
Under “Users’ website subdirectory to create“.
Change: Default (public_html)
To: [httpdocs]
Account Plans
One may customise them to match previous Plesk hosting “plans”, however this is not mandatory.
Virtual website creation – Admin username
The only requirement in this process is to create the Administration username as a “Custom username” giving it the domain.tld name (i.e. mydomain.com). This way the websites paths will end up being: /home/domain.tld, which makes it easier to do a path change from /var/www/vhosts to /home wherever there are scripts configurations containing full paths.
Perl
I am a perl script writer thus I use perl extensively, over the years I have created scripts that require a few additional modules. I shall not go into details with them (yet), however there’s an important bit I must mention, some perl scripts I use have a different #!. Some point to the sometimes non-existent /usr/local/bin/perl, so in order to avoid these script throwing an error I simply link it to the whereis perl (usally /usr/bin/perl or /bin/perl):
ln -s /usr/bin/perl /usr/local/bin/perl
Website content transfer
To transfer website content from Plesk to VM it is a matter of rsyncing each website with the rsync command, to minimise the load, the following commands are run at nice 20 from the source server, note that the target server must have the virtual server already configured prior to doing this, otherwise an error will be thrown:
port is the ssh port (if different than 22, which is recommended for security)
domain is the domain to be transferred
target is is the target server IP or domain
Depending on the size of the website this might take some time. Note that I am not really needing to transfer statistical information over. most if not all the required files are under httpdocs and cgi-bin in my case.
After the transfer, on the target server, ownership of the directories must be set:
username is the owner of the httpd and cgi-bin content (in my case I created a username matching the domain, making it easier to find the correct directory under /home when working over the CLI.
domain is the domain
Email content transfer
The operation of transferring emails to the target server are pretty much the same as website transfer, with a couple of exceptions.
IMAP changes (At client level, here using Thunderbird)
Server name: no change
Username: replace @ with .
Connection security: from SSL/TLS to STARTTLS
Authentication method: from encrypted password to normal password
SMTP changes (At client level, here using Thunderbird)
Server name: no change
Port from 25 to 587
Connection security: from SSL/TLS to STARTTLS
Authentication method: from encrypted password to normal password
Username: replace @ with .
Target server (after rsyncing all the dbs dumps on it)
VM Menu > Edit Databases > (manage current database usually called {domain}_{tld}) or create a new one if required.
click Manage …
Click Execute SQL
Run SQL from file Tab
From local file (browse to file)
Click Execute
Special characters
Sites with accents (like French’s)
The charset must be edited in the following Module:
Select Domain > Menu > Services > Configure Website > Languages > Character set for documents (x) iso-8859-1
In this series of Best Practice articles I talk about migrating websites and emails from a Plesk 11 run server to a Virtualmin run server. It describes in details the steps involved, including the eventual pitfalls and other thing I came across whilst doing it. Note that this documentation is addressed to people with medium expertise in linux/system administration.
Fed up with Plesk?
Since 2003 I have been using two brands of Dedicated Servers Control Panels: Ensim (RIP) and Plesk. So it’s died 🙁 oh well, Ensim was an awful CP, never liked it, I liked Plesk (from 8 to 11) a bit more and it has been my selected Control Panel for many years. However the time has come to make way for a relatively new comer: Virtualmin or VM for short, a very mature and simpler CP indeed with a vibrant Community.
Deciding to select another Control Panel is a big decision, especially when your bottom line is at stake, so after having extensively tested and used VM for the last few months I finally decided to make the move, VM is slick, simple and easy to use, it’s like Ronseal, it does what it says on the tin.
In this series of best practice articles I talk about migrating websites and emails from a Plesk 11 managed server to a Virtualmin managed server. It describes in some details the steps involved in doing it remedy the pitfalls and other things I came across whilst doing it. Note that this documentation is address to people with medium expertise in linux/system administration.
Hardware
A fresh install of a super fast multi-core web server with sufficient RAM and [Hardware] RAID 1 partitioned as follow:
My normal ssh logins are with public keys authentication (aka passwordless), however, under certain circumstances I’d like to revert back to good old passwords logins. Like when I want to transfer a Plesk server across another server using the Plesk Migration & Transfer manager.
After scouring the Net for some inspiration, which failed, and some tinkering, I finally found a neat solution to switch between the two (passwordless and normal authentication logins) quickly, the process is relatively simple* but frankly puzzling IMHO. I shall explain why: Continue reading Reverting to passworded SSH (root) logins